The Simple 301 redirect provides an easy method to forward an old or non-existent page to a new page on your site. You can also move your entire site from one domain to another.
The 301 redirect is your best bet to keep your current search-engine rankings… once the search engine updates its Web page index, it should recognize the status change and update your listings accordingly. By setting up this redirect, your old site/pages or any incoming links will be seamlessly passed along including your existing page rank as well.
Below code is for an individual page (place additional htaccess 301 redirects on a new line as shown below).
Redirect 301 /oldpage.html http://www.example.com/newpage.html
Redirect 301 /about.html http://www.example.com/about/
There are multiple types of URL redirects. The way these are broken down is Redirect Type – Brief Translation – Benefits – Search Engine Directions.
- 301 – Moved Permanently – Passes link equity and saves PageRank – Use new URL from now on.
- 302 – Found – Page temporarily located at a different URL – Continue to use old URL.
- 303 – See Other – Page found under a different URL – New URL not a substitute for originally requested resource.
- 307 – Temporary Redirect – Page temporarily located at a different URL – Redirection MAY be altered on occasion – Continue to use original URL.
Redirecting web pages is a single task that is very important to search engine optimization (SEO). All webmasters will eventually be called upon to implement redirects. So it is important for them to understand the only globally accepted SEO-friendly redirect in their arsenal – the 301 permanent redirect.
While there are other implementations of redirects via meta refresh elements, JavaScript, and 302 temporary redirects, only the 301 redirect is useful from an SEO perspective. So the focus of this post is 301 redirection.
When are redirecting web pages necessary?
When a web page is deleted or moved to a new location (i.e. its URL is changed), it is almost always a good idea to implement a 301 Permanently Moved redirect. The 301 redirection will notify any browser or crawler requesting the old URL that it has been permanently moved as well as provide with the new location of the web page. This should be done for many reasons… some of which are SEO-related… some of which are usability-related.
One of the few situations when you might not want to implement a 301 redirect is if you delete a web page and you do not have another page on your site whose content even remotely resembles the content of the old page. But typically in this situation, I’ll 301 redirect the old URL to my home page so that it at least benefits from the page rank being passed into the old URL via its inbound links.
Why is redirecting a web page important?
The most important asset that a web page has from an SEO perspective is its inbound links, especially those links from external sites. Inbound links from other sites can bring your site natural traffic as a result of users following links from other sites. Inbound links are also important to a URL’s ranking in the search engine results pages (SERPs).
A URL’s inbound links and their associated link text carry more weight than any other ranking factor in determining how a web page ranks for a particular keyword phrase. So a good webmaster will always try to maximize the SEO benefits gained from links pointing to their site. 301 redirecting old web pages which have been deleted or moved will insure that the inbound links to the old page are not wasted.
Redirecting web pages with a 301 redirect
When a web page is deleted or moved, the webmaster should implement a 301 permanently redirecting the web page’s old URL to a URL on the site whose content most closely resembles the content previously found at the old URL. By doing so, they maximize the chance that the target web page will benefit from an SEO perspective since the link text of the old URL’s inbound links will likely be applicable to the content of the new page if they are similar.
An Example:
For the sake of having a good example, let’s say that you own www.example.com and had an informational page at www.example.com/aboutus.php. If you wanted to change the page URL to something more like www.example.com/whatwedo.php, you would lose all the traffic that you currently get to the old page at www.example.com/aboutus.php. However, if you implement a 301 redirect from the old page to the new one, anybody who goes to the old page or URL will be redirected to your new page and URL.
Effects of 301 redirects for SEO
If you’re familiar with the concept of SEO, you’re probably familiar with the importance of incoming links also. Well, let’s say you have 2000 incoming links to www.website.com but because www.daredevil.com is new, there are no incoming links to it. Therefore, if you don’t redirect your domain, you have just lost all of your 2000 links.
But, If you do a 301 redirect from www.website.com to www.example.com, you keep approximately 99% of the link equity that you built up for the first domain. This means that once Google and Bing recognize that you redirected your domain, the links that you built to the old domain will now point to the new domain and therefor you already have some street-cred with the search engines.
How 301 redirects actually work
For example, imagine that a web page at URL A on your site has 1000 inbound links with many variations of “your targeted phrase” as the link text. Also assume that URL A ranks well for “your targeted phrase” and several slight variations of that phrase resulting in quite a bit of organic search traffic to the web page found at URL A.
Now assume that for whatever reason you need to move the page found at URL A to a new location at URL B. So you implement a 301 redirect for URL A to notify browsers and search engine crawlers that you have permanently moved the web page to URL B.
The next time the search engine crawls one of those 1000 inbound links and requests URL A from your web server, it will return an HTTP Status of 301 Moved Permanently with a Location value of URL B. This tells browsers and crawlers that the page they requested has been permanently moved and can now be found at URL B.
So the crawler will then request URL B. If your web server successfully serves up URL B and returns a 200 Ok HTTP Status then the search engine will transfer credit for that inbound link (and its associated link text) from URL A over to URL B. Now URL B has 1 inbound link that the search engine knows about.
Depending on the search engine, URL A might be immediately dropped from the index upon finding the first 301 redirect since it no longer exists (as is the case at Google) or the old URL A may simply now be seen as having 999 inbound links. Either way, as the inbound links to URL A are recrawled, credit for all of those links will transferred to URL B over time.
It is during this period when all of the inbound links to URL A are being recrawled, the 301 redirect is being discovered for each inbound link, and credit is being transferred to URL B for each inbound link that rankings and traffic will suffer. The good news is that if URL B is optimized to rank for the same keyword phrase as the old URL A then rankings and traffic should return once all inbound links to URL A have been recrawled.
+
How long it takes for your rankings and traffic to return depends on the crawl frequencies of the URLs that link to the old URL A. Some sites may get crawled daily while other sites linking to your web page might be crawled once every 4-6 weeks. So there is really not a lot you can do to speed up the process other than to be patient.
When can you stop redirecting web pages?
A lot of people have the misconception that redirecting web pages are only needed until all of the inbound links to the old URL have been recrawled and the new URL starts ranking. They think that once the rankings of the new URL return to the levels of the old URL that the 301 redirect can then be removed. This is not the case.
Once a 301 redirect is in place, redirecting the web page at URL A to URL B, if you want URL B to continue to benefit from URL A’s inbound links then that 301 redirect must remain in place forever. If you remove the 301 redirect then the next time that the crawler requests URL A your web server will return a 404 Not Found HTTP Status telling the browser that the URL A web page doesn’t exist. If your server continues to return 404s for URL A for an extended period of time, then URL B will begin losing credit for the inbound links to URL A. Rankings and traffic will likely plummet again.
If your web site is hosted on an Apache web server then I highly recommend familiarizing yourself with the basics of regular expressions and Mod Rewrite. The Mod Rewrite utility allows you to easily redirect web pages on your site using rewrite rules and conditions specified in .htaccess files. Once the .htaccess files are in place, you can actual++ly delete older web pages from your servers and the redirects will remain in place.
Redirecting web pages multiple times
Sometimes you will encounter situations where URL A has been 301 redirected to URL B for some period of time, but you now need to move URL B to URL C. One way to accomplish this is to simply 301 redirect all requests for URL B to URL C. However, this creates what is known as a stacked redirect. If a crawler requests URL A, it is redirected to URL B. When it requests URL B it is redirected to URL C. This daisy chaining or stacking of redirects is not optimal.
The optimal way to implement this is to un-stack the redirects. In other words, implement two separate redirects:
• 301 redirect requests for URL A to URL C
• 301 redirect requests for URL B to URL C
By implementing two redirects like the ones above, you avoid stacked redirects which can be a problem for some less sophisticated search engines.
It is also rumored that each redirect causes the inbound link to lose a small percentage of its “link juice”. So if there is any truth to this then being able to get to the final page in a single redirect will minimize the amount of “juice” lost to redirecting web pages.
302 vs 301 Redirect
A 302 redirect says that you’ve moved a page or domain, but only temporarily and the original page will come back. Exactly why someone would do this, I do+n’t know. Maybe they’re running a web contest that they will bring back later. Maybe they’re doing a content or conversion test. In any case, a 302 redirect tells that the page has changed, but it is not permanent and therefore the redirection will not pass any SEO link equity that you may have built up.
With a 302 redirect, you will continue to get the traffic from people that have that page bookmarked or find it via a link in social media. And when someone tries to get to the old page via a search engine, they’ll still get to the new page so you won’t lose all your traffic, but you won’t get the SEO benefit of the link equity that you built.
A 301 redirect, on the other hand, tells Bing and Google that the page has been moved permanently and all SEO link equity should be transferred to the new page or domain.
301 Redirect implementations on different platforms
The next step is to figure out what kind of website and server you have. The way you create a 301 redirect depends upon the type of server and/or the type of content management system that you’re running as the basis for your website. This means that if you have a Linux server, you can use a .htaccess redirect. If you have a Windows server, you’ll need to do and IIS redirect. And of course WordPress has different redirect options than does Joomla!, Drupal, Shopify, or Blogspot. If your website is based on PHP, you can use a PHP 301 redirect.
htaccess 301 Redirect
If you have a standard Linux server, you probably have Apache as the actual Web server software. The other alternatives include Lighttpd (pronounced “Lighty”) and Nginx (pronounced “Engine-X”) but they’re not overly common. If you have a file called “.htaccess” in your “public_html” folder, you know you’ve got Apache running on your server.
.htaccess file 301 Redirects taught on this page include:
- Redirect a Single Page
- Redirect an Entire Site
- Redirect all subpages without redirecting the entire domain
- Redirect a site to WWW
- Redirect a site to Non-WWW
This is the easiest and cleanest way to redirect a domain or URL.
The Code Required:
Redirect 301 /oldpage.html http://www.yoursite.com/newpage.html
Redirect 301 /oldpage2.html http://www.yoursite.com/folder/
Redirect 301 / http://www.yoursite.com/blog/
How To Redirect an entire site
The Code Required:
Redirect 301 / http://website.com/
Redirect Only Subpages
If you need to 301 redirect all the subpages of a domain but don’t want to redirect www.domain.com itself, you can use the following bit of code.
RewriteEngine on
RewriteCond %{REQUEST_URI} !^/$
RewriteRule ^(.*)$ http://example.com/$1 [R=301,L]
Redirect to WWW or to non-WWW
At the beginning of the URL, some people like the WWW. Some find that it scary and doesn’t want to have it. Whichever you prefer, and thankfully it doesn’t truly matter, is up to you. Doing a redirect from examplecom to wwwwexamplecom is fine as long as it is a correct 301 redirect. It’s also perfectly acceptable to redirect www.examplecom to examplecom.
It’s only best when you choose 1 way or the other for SEO because Google can view example.com and www.example.com as separate sites. This means that if you have incoming links to both website.com and www.example.com, there is a chance that both of them will build different pages in Google’s eyes. So to correct that, here’s how you can make everything look straight using the htaccess file.
Redirect to WWW with the htaccess file
.htaccess file is located at the root folder of your website. You can easily find the program from any FTP program or file browser of cpanel. Be sure to show hidden files if you are unable to find this file on your website’s root directory.
Note: Take a backup of the file before any kind of changes.
To edit the .htaccess file, follow the instructions above and insert the following code at the head of the file.
RewriteEngine On
RewriteCond %{HTTP_HOST} ^domain.com$
RewriteRule (.*) http://www.website.com/$1 [R=301,L]
Redirect to non-WWW with the htaccesss file
RewriteEngine On
RewriteCond %{HTTP_HOST} !^example.com$
RewriteRule (.*) http://example.com/$1 [R=301,L]
Redirect 404 Errors to home page
If you have multiple pages with a 404 error and you don’t want to take the time to redirect each and every one of them, I strongly recommend that you add the following code into your.htaccess file. It will automatically redirect all 404 error pages to your home page, improving your SEO and keeping people on your site.
RewriteEngine on
RewriteCond %{REQUEST_FILENAME} !-f
RewriteRule . / [L,R=301]
Redirect your domain in cPanel
Now I will show you how to easily redirect the whole domain, file or folder to another location using the standard installation for cPanel webhost. It’s quick, clean and straightforward.
We continue with assuming you’re already logged in. If you’re not, sign in to your cPanel hosting account before following the guidelines mentioned below.
- Scroll down until you see the domains section, and click on redirects.
- Choose a permanent, 301, redirect because it has the best Seo benefits.
- Choose the specific domain that you want to redirect
- Choose redirect with or without WWW.
- Click on “Make this a wildcard redirect”.
- And now click on the “Add this redirect” button.
Other Variations:
Redirect your domain.com to www.domain.com
- Choose your domain
- Click on “Do Not Redirect www.”
- In the “redirects to –>” box, enter http://www.domain.com
- Click the “make this a wildcard redirect” checkbox
- And now click on the “Add this redirect” button.
Redirect a folder or page within your domain
- Choose your domain
- Click on “redirect with or without www.” And put the old filename or folder name in the following text box.
- In the “redirects to –>” box, enter http://www.domain.com/New-File-or-Folder-Name
- Click the “make this a wildcard redirect” checkbox
- Click the “Add this redirect” button. And you’re finished.
301 Redirect in Java
Java code, which runs without recompilation on multiple different platforms. This saves programmers the time needed to recompile portions of the code and re-write them. Obviously, this is not important for web programming because it’s how all web programming is done Everything is interpreted by your web browser such as Chrome, Internet Explorer, or Chromium.
Creating a website or even a page in Java, actually JavaServer Pages, requires a compatible web server with a servlet container, think of it as an interpreter for the web server, such as Apache Tomcat or Jetty.
If your website is based on Sun’s JavaServer Pages, also known as JSP, your method of doing a 301 redirect is slightly different
coode Required:
<% response.setStatus(301);
response.setHeader( “Location”, “http://www.newexample.com/OrPage.jsp” ); response.setHeader( “Connection”, “close” ); %>
Once you have created your redirect, be sure to manually check your work by trying the old website address. You should be taken to the new page automatically. If it works fine, you’re done with it. If you don’t, check your code again to see where it’s dissimilar.
PHP 301 Redirect
If your website has been created in PHP and you need to redirect a page, you need to use PHP 301 Redirect. You have two different options depending on what you need. You can redirect a single page to another page, or you can redirect a whole website from website.com to www.example.com.
How to redirect a single page
DO NOT delete the original file. Go to the old PHP file that needs to be redirected and remove all the code and replace it with this. And just to state the obvious, “http://www.new-example.com” needs to be replaced with the URL of the page you want it to redirect to.
<?php
Header( “HTTP/1.1 301 Moved Permanently” );
Header( “Location: http://www.new-example.com” );
exit();
?>
How to redirect example.com to www.example.com
It should be noted that for SEO purposes, a link to website.com and a link to www.example.com are NOT the same unless you have a 301 redirect from website.com to www.example.com. If your site visitors see the www edition, but your links go to the non-www version, it is entirely possible that they will not recognize or transfer the equity of link for your SEO efforts.
If you want to have www. at the beginning of your domain, put this code on every single page:
<?php
if ($_SERVER[‘HTTP_HOST’] != ‘www.domain.com’){ header(“Location: http://www.domain.com”.$_SERVER[‘REQUEST_URI’]);
}
?>
How to redirect from www.website.com to website.com
If you don’t want to have www. in your domain, put the following code on every single page:
<?php if ($_SERVER[‘HTTP_HOST’] == ‘www.domain.com’){ header(“Location: http://domain.com”.$_SERVER[‘REQUEST_URI’]); }?>
How To 301 Redirect A Product, Page, or Post In Shopify
In case you’re not using it, Shopify is an eCommerce webhosting platform that solves many of the problems that small businesses experience. They eliminate your need for PCI compliance as they provide 100% PCI Compliant web hosting and payment processing.
Shopify has beautiful themes ready to go for your site as well as multiple payment methods and plugins to make your site do whatever you want.
How To 301 Redirect in Shopify
You must first be logged into the control panel of your Shopify store
- click on the tab on the left hand side that says “Links”.

Click here to begin
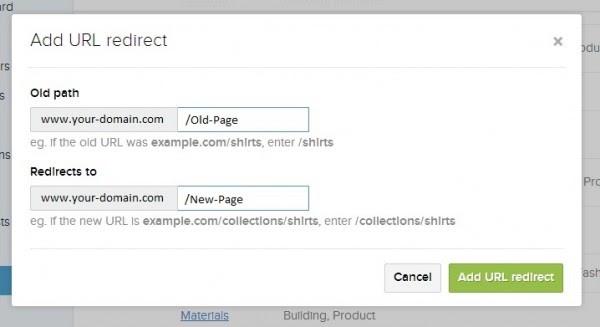
- Scroll to the bottom of the page and you will see a line of text that says URL redirects prevent bookmarks and links to your previous site from breaking. Add your first URL redirect. The very end of the line where it says “Add your first URL redirect” will be blue and it is a link to a pop-up box that will allow you to redirect one page to another.
- Enter the rest of your in the top box then enter the rest of your new URL in the bottom box.
- Then click the “Add URL redirect” button and you’re done.
Old Shopify 301 Redirect
- Find and click the “Navigation” tab at the top of your screen.

Find the navigation Tab.
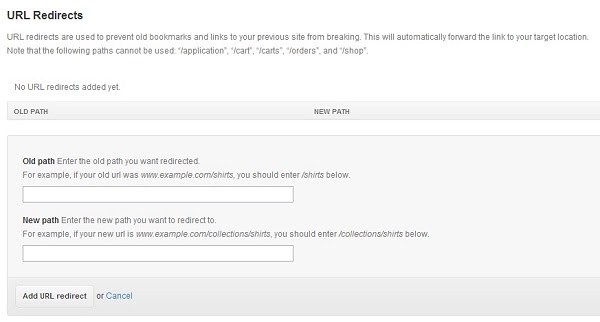
- Scroll all the way down to the bottom of the page and look for the section that says “URL Redirects”
- Click the button that says “Add URL redirect”

Click the Button saying “Add URL Redirect”
- The button will immediately be replaced by a section with two boxes that you can enter a URL in.
- Enter your old URL in the top box and your new URL in the bottom box.
- Then click the “Add URL redirect” button and you’re done.
Enter the URL you want to redirect to and from.
WordPress Page / Post 301 Redirect
If you need a wordpress 301 redirect, this is a really easy one! You need the plugin “Redirection” from John Godley.
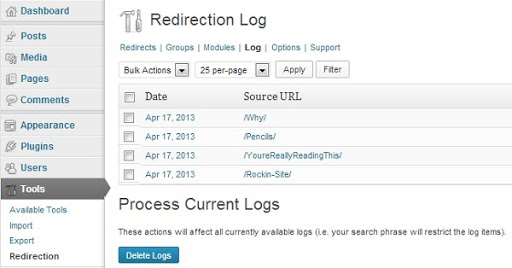
What makes John’s redirection plugin so freaking cool isn’t just the ability to easily redirect pages in WordPress, but that it has logs of pages that come up with 404 errors so that you know which pages need to be redirected to a new page! That’s right, it logs failed pages for you so that you can send that traffic to another, more valuable, location. Sweet!
I am going on the assumption that you know how to install a WordPress plugin. If not, Click Here for instructions. These are the basics. If you like it and want to dive in deeper, I highly recommend that you check the “John Godley” link above. He gives more information than I do.
Here’s how it works
Let’s say, for instance, that you have a URL of http://www.website.com/useful-info/ but you want to change the name to http://www.website.com/ultimate-info/, without losing traffic or SEO link equity, no problem.

301 Redirection for WordPress
- Once Redirection is installed and activated, go to the “Installed Plugins” page and find Redirection.
- Click on the link “Settings” immediately below it. This will take you to a screen that has your options on redirecting one page to another.
- Simply type the old URL (http://www.website.com/useful-Info/) into the box next to “Source URL”
- Now enter the new page URL (http://www.website.com/Ultimate-Info/) into the box next to “Target URL”.
- Click on the “Add Redirection” button.
- Congrats! You’ve successfully done a WordPress 301 Redirect!
What Needs To be Redirected?
Remember at the beginning of the post when I mentioned that Redirection keeps logs of pages that create 404 errors? Well, here’s how you find them.
WordPress Redirection Logs
- In Redirection, “Redirects” is currently bold. This is a tab. Click on “Log”
- As you see, there are source URLs there. Copy one and go back to the “Redirects” tab and follow the instructions above.
- Don’t forget, you will need to enter your domain in the for of “http://www.your-domain.com” before the source URL that the log gives you.
I know, it would be great if John wrote in that you could click the button and add the source URLs to a list to be redirected. Well, maybe in the next version.
There are some excellent plugins for that work for SEO and are easy to use for instant 301 redirects. We recommend the following 301 redirect plugins:
Redirect a WordPress Site to WWW
Even though it’s no longer necessary, seeing the famous “www” in front of a website has become the standard. And to some, having the “www” there is a small sign of a website’s professionalism. Not having it there isn’t a demerit in the search engines, but it could be a small demerit in the eyes of your potential customers.
So how do you redirect your WordPress site from “http://website.com” to “http://www.website.com”? That’s simple! And truthfully, it doesn’t get any easier than doing it in WordPress.
All you have to do is this.
- Login to the WordPress dashboard
- Click the “Settings” button on the left-hand column
- Find the box marked “WordPress Address (URL)” and change http://your-website.com to http://www.your-website.com
- Find the box marked “Site Address (URL)” and change http://your-website.com to http://www.your-website.com
- Click the button marked “Save Changes”.
Redirect All 404 Errors In WordPress To Home Page
If you have a lot of pages that end in a 404 error, you’ll need to redirect them so you don’t frustrate your customers or lose the link equity you’ve built.
Now, in other pages on this site, I’ve told you how to do single redirects in WordPress or how to redirect your entire site to a www or non-www version of your site but this one is different. A simple bit of code to replace your existing 404.php file contents will redirect any misspelled page or any page that has been removed will automatically be redirected to your home page.
There’s just 1 simple little issue and that was introduced into some of the more recent versions of WordPress. So I have separated out the 2 versions and their separate codes below.
Here’s how you do it.
- Go to your WordPress dashboard.
- Hover over “Appearance” on your left-side menu.
- Click on “Editor”.
- Find “404 Template (404.php)” under the Templates list on the right and click on it.
- Delete all the code and text in that page.
- Copy and paste in the code below.
- Click “Update File”.
Code required:
<?php wp_redirect( ‘http://www.YourDomainName.com’, 301 ); exit; ?>
This is a most detailed article on 301 redirect and I hope this might have given you a complete insight on how to implement redirection concept in different platforms.
Conclusion:
Sometimes we need to change the URL of the page, doing so is simple but there are few risks in this. If you are changing the URL of page which is popular and indexed in search engine, you are going to loose the visitors and ranking both. So, you should always do this process with extra care. Once you have changed the URL, redirect the old URL to the new to pass visitors and ranking both. This redirect should be 301 redirect. 301 redirect tells search engines that web page has been moved permanently to the new web address.